Up-to-date with version 3.0.5962
MusicBee provides a number of ways to edit track details (formally known as metadata, informally known as tags).
You can edit any tag you have displayed as a column in the main panel by selecting the track and then clicking once on the tag. (If you dislike this feature, you can disable it in Tag Preferences.) If you edit the currently playing track, changes will not be saved until a new track plays or playback is stopped.
That's a handy way to make quick manual corrections, but for more extensive tagging projects you'll probably want to check out the comprehensive tagging features below.
Tag Editor[]
You can open the tag editor for any track or group of tracks by selecting them, right clicking, and choosing "Edit" from the menu. There is also a hotkey for this command (Shift+Enter by default).
If you edit more than one track at once, there will be a check box next to each field. If you change a field, it will be automatically checked and the value will be applied to all the tracks. Fields which have differing values will be shown as blank, and checking this box will clear them all. Both these operations will overwrite any existing values in the field.
The tag editor can be shown as a floating window or docked at the bottom of the main panel. Each tab of the editor is shown below, along with a list of how the tags are saved to the file for some common formats.
- Tag Standards
Tag standards refer to the expected format of metadata in a file, in our case audio files. Standards provide a common syntax that allows tags to be read and edited across multiple programs and devices.
Each file format has a particular tagging standard:
- ID3 for MP3
- ID3v2.3 is the most common, but MusicBee also supports v1 and v2.4
- Xiph Comments for FLAC and Ogg Vorbis
- proprietary formats for WMA and AAC
- WAV files have less definite standards, but Steven says this is how MusicBee handles them:
- LIST/ INFO chunk which is a standard that covers some of the tags
- ID3 chunk which I don't think is a standard WAV file tagging type but a number of players are using it. (The ID3 tags themselves are standard.)
- AIFF files cannot be tagged except by saving the tags in the MusicBee database
- MusicBee will read but not write APE tags
Properties[]
Properties
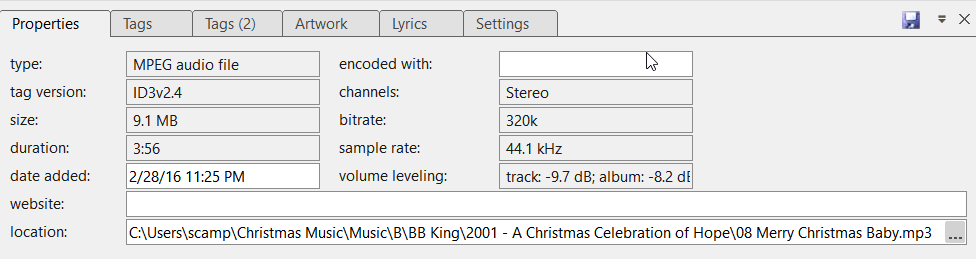
Properties docked in the main panel
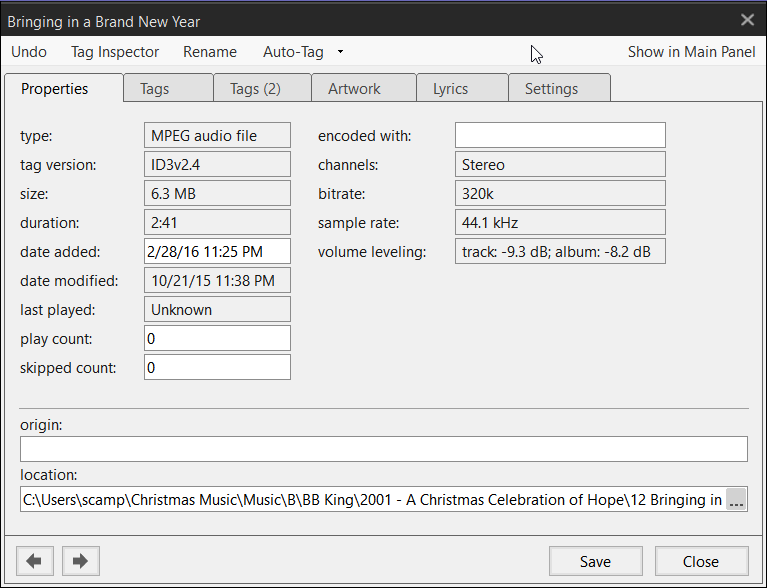
The properties tab mostly shows descriptive file info that cannot be edited directly. However, you can choose to change the date added to the MB database, encoder info, and play/skip counts if you wish. You can also add or edit source website info, and filename unless you're using Auto-Organize.
Due to reduced space, Date Modified, Last Played, and Play/Skip Count are not available when the tag editor is docked in the main panel.
| Name | ID3v2 (MP3) | Vorbis (FLAC) | WMA |
|---|---|---|---|
| Encoded With | TENC | ENCODEDBY | WM/EncodedBy |
| Origin Website | WOAS | WWWAUDIOSOURCE | WM/AudioSourceURL |
Tags[]
Tags
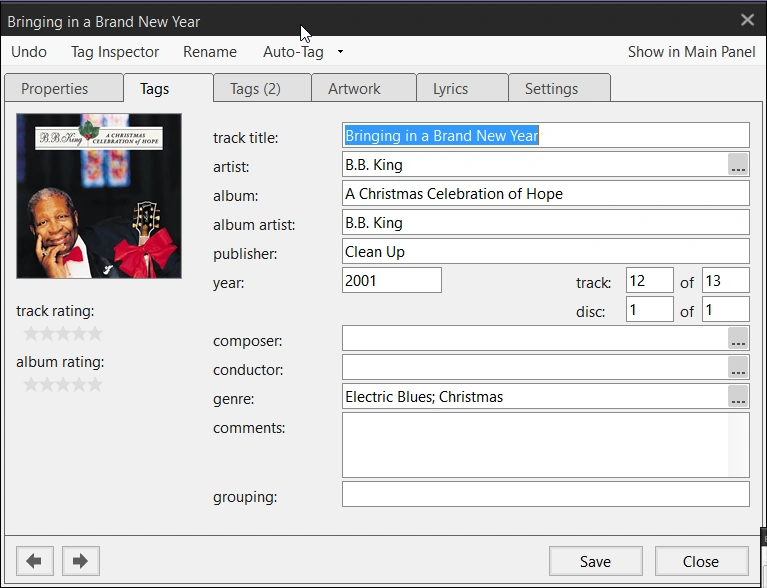
This tab shows major info about the track like Title, Artist, etc. You can also set Track and Album rating, and you can use the artwork frame here to add artwork just like the one on the Artwork tab.
| Name | ID3v2 (MP3) | Vorbis (FLAC) | WMA |
|---|---|---|---|
| Track Title | TIT2 | TITLE | Title |
| Artist | TPE1 | ARTIST | Author |
| Album | TALB | ALBUM | WM/AlbumTitle |
| Album Artist | TPE2 | ALBUMARTIST | WM/AlbumArtist |
| Publisher | TPUB | ORGANIZATION | WM/Publisher |
| Year | TYER (2.3) TDAT (2.3) TDRC (2.4) |
DATE | WM/Year |
| Track Number | TRCK | TRACKNUMBER | WM/TrackNumber |
| Total Tracks | TRCK | TOTALTRACKS or TRACKTOTAL | |
| Disc # | TPOS | DISCNUMBER | WM/PartOfSet |
| Total Discs | TPOS | TOTALDISCS | |
| Composer | TCOM | COMPOSER | WM/Composer |
| Conductor | TPE3 | CONDUCTOR | WM/Conductor |
| Genre | TCON | GENRE | WM/Genre |
| Comment | COMM | COMMENT | WM/Comments? |
| Grouping | TIT1 | CONTENTGROUP | WM/ContentGroup Description |
| Track Rating | POPM | RATING | WM/SharedUserRating |
| Album Rating | POPM | RATING | WM/SharedUserRating |
Multiple Value Tags[]
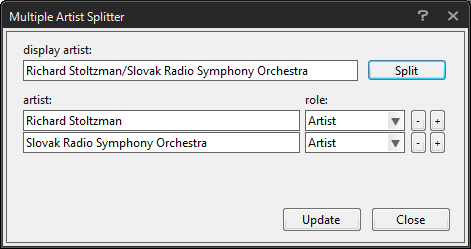
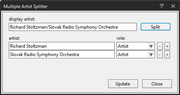
Multiple Artist Splitter
MusicBee allows multiple values to be stored for many tag fields. Each value is separated using a semicolon (;). For example, entering 'Justin Timberlake; Ciara' would store both artists and include both artists separately in places like Artists View and the Column Browser. You can also click the [...] button to open a multiple value editor. Splitter screens are limited by the size of your monitor; if there are so many values that the splitter exceeds the window size, you should use the Tag Inspector to continue.
The Artist and Composer fields allow you to enter a special Display tag, which is shown in the Tag Editor and the corresponding fields in your library, while preserving split tag values in the file. For example, you might prefer to display 'Justin Timberlake ft. Ciara' while splitting the artists. If the Artist value is currently saved as 'Justin Timberlake ft. Ciara', opening the Multiple Artist Splitter and pressing the Split button will automatically separate the artists for you, while leaving the original value as the Display Artist. The artist splitter further allows you to choose a role for the artists listed and adjusts the tags accordingly: Artist, Performer, Guest Artist, or Remixer. See Special Fields for how to use split artist values in columns, templates, and so on.
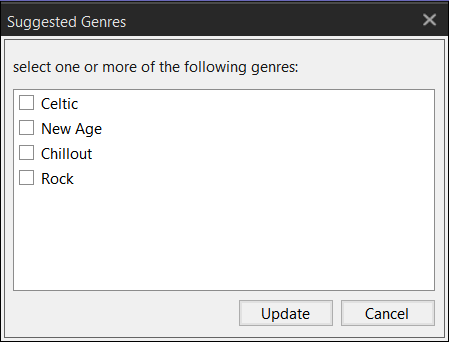
Suggested Genres
The genre splitter is also unique in that it has a "Suggested Genres" button, which will show you some of the top genres for that track from last.fm and let you choose to apply them.
Tip: To add or remove a specific value from a multi-value field on several tracks where there are differing values (so that using the Tag Editor would cause the differing values to be lost), you can use the Tag Inspector.
Tip: When scrobbling to last.fm, MusicBee uses the Display Artist value. If you need to change your tags to match last.fm but don't want to change your official Artist tag, you can use the Display Artist for last.fm and keep your preferred Artist tag in the multiple artist splitter.
Tip: It's rare, but if you have an artist with a semicolon in the name, you can use a Lisu tone character instead, to keep the the tag from being split. Just copy and paste this character in place of the semicolon: ꓼ
| Name | ID3v2 (MP3) | Vorbis (FLAC) | WMA |
|---|---|---|---|
| Display Artist | TXXX/DISPLAY ARTIST | DISPLAY ARTIST | |
| Guest Artist | TXXX/GUEST ARTIST | GUEST ARTIST | |
| Performer | IPLS (2.3) TMCL (2.4) TXXX/PERFORMER |
PERFORMER | |
| Remixer | TPE4 TXXX/REMIXER |
REMIXER | WM/ModifiedBy |
| Display Composer | TXXX/DISPLAY COMPOSER | DISPLAY COMPOSER |
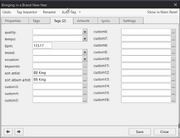
Tags (2)[]

.png)
Tags (2)
This tab contains supplementary information about the track, including up to 16 Custom Tags of your choice.
Quality, Tempo, Mood and Occasion have lists of values you can choose from, or you can enter your own. Using the "..." button next to Keywords will populate it with values from the last.fm tag cloud. You can also enter your own, but use a comma to separate them instead of the usual semicolon.
Sort Artist and Sort Album Artist are actually Custom Tags which are pre-configured, but can be changed if you prefer not to use them.
| Name | ID3v2 (MP3) | Vorbis (FLAC) | WMA |
|---|---|---|---|
| Quality | TXXX/QUALITY | QUALITY | |
| Tempo | TXXX/TEMPO | TEMPO | |
| BPM | TBPM | BPM | WM/BeatsPerMinute |
| Mood | TXXX/MOOD (2.3) TMOO (2.4) |
MOOD | WM/Mood |
| Occasion | TXXX/OCCASION | OCCASION | |
| Keywords | TXXX/KEYWORDS | KEYWORDS |
Artwork[]
- Main article: Album Art and Artist Photos

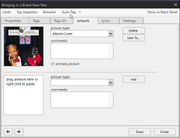
Artwork tab
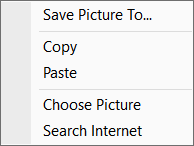
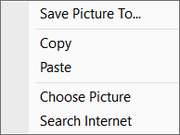
Artwork context menu
The Artwork tab in the tag editor allows you to add, delete, copy, save, or reorder artwork attached to a track.
- Copy & paste or drag & drop an image
- Click the Add button and choose a picture from your computer
- Right click on the artwork frame and select 'Search Internet' - MusicBee will search the artwork providers you have enabled in Tags (2)
Whatever the source, on choosing a picture you will be prompted to decide how to store it (unless you have unchecked "confirm picture storage options when adding artwork" in General Preferences).
- picture type
You can add artwork in a lot of ways, but this tab of the Tag Editor is the only place you can set the artwork type to anything other than "Album Cover". Types available are:
|
|
|
- comments
Enter comments about the artwork
- primary picture
Make the ticked image the image shown in most places for this track/album. The others will only be shown in the Track Information panel, if you select them directly or when "Enable Image Rotation" is ticked.
- Save To...
Using this button or the right-click menu, you can save the artwork to an external location.
Lyrics[]
- Main article: Lyrics
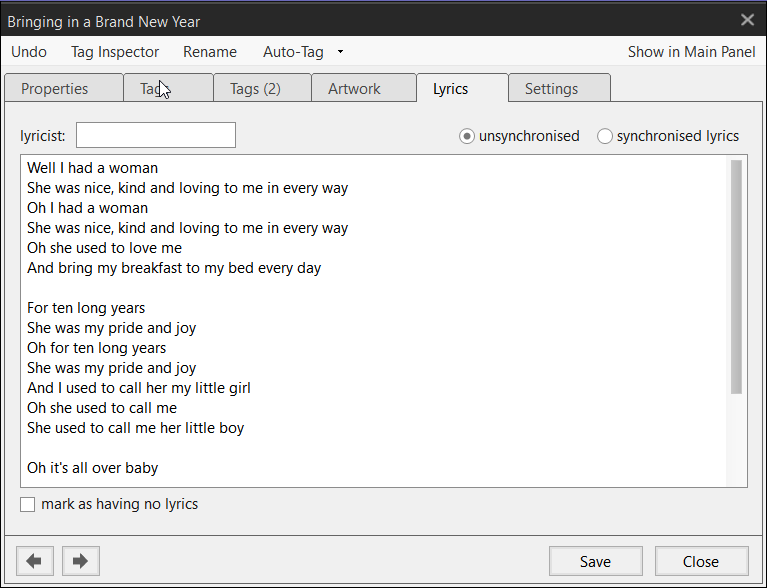
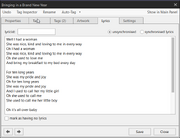
Lyrics
Only MP3s offer a way to save synchronised and unsynchronised lyrics separately. Checking "mark as having no lyrics" will keep MusicBee from searching for lyrics for that track.
| Name | ID3v2 (MP3) | Vorbis (FLAC) | WMA |
|---|---|---|---|
| Lyricist | TEXT | LYRICIST | WM/Writer |
| Unsynchronised Lyrics | USLT | LYRICS? | WM/Lyrics |
| Synchronised Lyrics | SYLT | LYRICS? | WM/Lyrics |
Settings[]
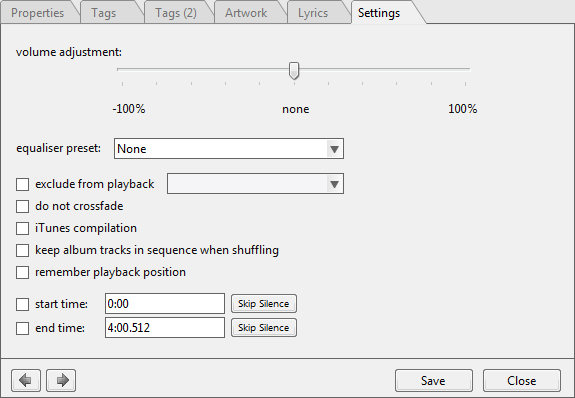
This tab lets you adjust various settings for the track.
- volume adjustment
You can use this slider instead of or in addition to Volume Analysis, to fine tune the volume of specific tracks.
- equalizer preset
Choose a specific equalizer preset that will always be applied to a track or tracks.
- exclude from playback
Will prevent a track from playing under some or all circumstances:
- Full Ban: track will always be skipped
- Only when shuffling: track will not be included when shuffling or using Auto DJ
- iTunes compilation
You can apply special handling to tracks marked as iTunes compilations in Sorting & Grouping preferences.
- keep album tracks in sequence when shuffling
(Default: unticked) The whole album will play in order, even when shuffling.
- remember playback position
(Default: unticked) Tick to make MusicBee start the track from the spot where it last stopped (i.e. to keep your spot in audiobooks, podcasts, etc.)
- start time
- end time
(Default: 0:00 and end of track) If you adjust the start or end time for the track, the parts of the track not between the start and end times will not be played.
- Skip Silence
These buttons will cause MusicBee to try to detect silent periods at the start and end of the track and adjust the start/end times accordingly.
| Name | ID3v2 (MP3) | Vorbis (FLAC) | WMA |
|---|---|---|---|
| Volume Adjustment | RVAD (2.3) RVA2 (2.4) |
VOLUMEADJUSTMENT? | |
| iTunes Compilation | TCMP | COMPILATION |
Tag Editor Menu[]


Menu in floating window
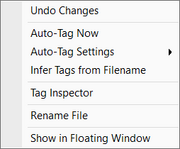
Menu in docked panel
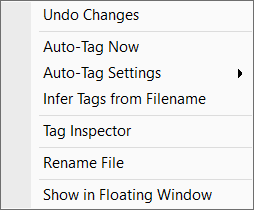
The Tag Editor has an internal menu, which is displayed across the top in the floating window, and in a button at the top right when docked in the main panel.
- Undo
This command will revert any unsaved changes you've made in the tag editor. Changes typically appear with a different font color until you save them - this command will only affect that different color text.
You can also undo your last tag change immediately after saving, but you need to go to the Edit Menu for that.
- Tag Inspector
Opens the Tag Inspector for the selected track(s).
- Rename
Opens the File Organizer for the selected track(s). Disabled for tracks which are auto-organized.
- Auto-Tag
- Main article: Auto-Tagging
Automatically retrieves artist, track, lyrics, album, artwork, and genre. Results will be loaded into the tag editor but you will still need to save them.
Tag Inspector[]
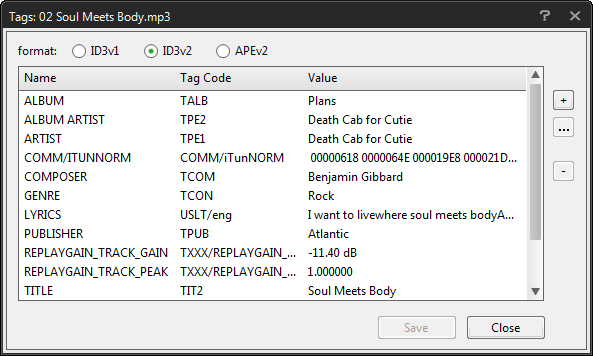
The Tag Editor allows you to edit most common tags in a music file and the specific custom tags you have configured in MusicBee, but there may be other tags attached to your files that are not shown. The Tag Inspector lets you access all tags attached to a file (except artwork). You can also add, delete, and edit tags in the Tag Inspector. An important difference between editing in the Tag Editor and the Tag Inspector, is that tags added or removed with the Tag Inspector will not overwrite other tags in the same field for the selected files.
To open it, use the menu across the top of the Tag Editor (or the drop-down menu, if docked in the main panel).
- Click the [+] button to add a new tag to the music file. You will be prompted to select the id for a predefined tag or enter a new name if you require, and then the tag value.
- Click the [...] button to edit the selected tag value.
- Click the [-] button to delete the selected tag.
- If multiple files are selected, adding, editing, or deleting tags will affect all selected tracks. Ticking the box in front of an existing tag will apply it to all selected tracks.
Copying Tags and Replacing Files[]
The menu action Edit > Copy Tags (Hotkey: Ctrl+Shift+C) will copy the tags of a selected file but leave out any artwork, ratings and the number of times the track has been played or skipped. However, you can set up another hotkey to copy all this including tags from Preferences > Hotkeys > Edit: Copy Tags, Artwork, Play Counters and Rating. Edit > Paste or Ctrl+V will paste the copied tags into another track.
You can also choose to replace a file with another file, while leaving the tags of the replaced file intact. This command is in the Send To menu. The file you replace will be deleted and the new file will be given the same file path, location in playlists, and tags as the deleted file.
- Caution
- When copying tags, replacing files, or converting files to another format, tags not shown in the Tag Editor will not be retained. Make sure you configure any fields you want to keep as custom tags.
Auto-Tagging[]
- Main article: Auto-Tagging
Auto-tagging uses online databases to tag albums or tracks.
Tagging Tools[]
- Main article: Tagging Tools
The Tools Menu contains batch tagging functions such as Remove Tags, Renumber Tracks, and Search and Replace.
| Tags |
|
Tagging · Tag Editor · Tag Inspector · Auto-Tagging · Tagging Tools · Artwork · Lyrics · Genres |