Up-to-date with version 3.0.5993
MusicBee offers tools for renaming, organizing, and/or copying your audio files, which can be applied manually or automatically.
It is strongly recommended that if you want to move your files to another location, you use MusicBee to do so. This will allow MusicBee to keep the files linked and prevent loss of information such as date added and play/skip count. (However, in the case that MusicBee has "lost" files that were moved by other means, you may be able to relink them with the Relink Music File Paths command.)
Manual Organization[]
- NOTE
- Except for Copy commands, all manual organization is disabled when Auto-Organize is enabled.
Organize Files[]
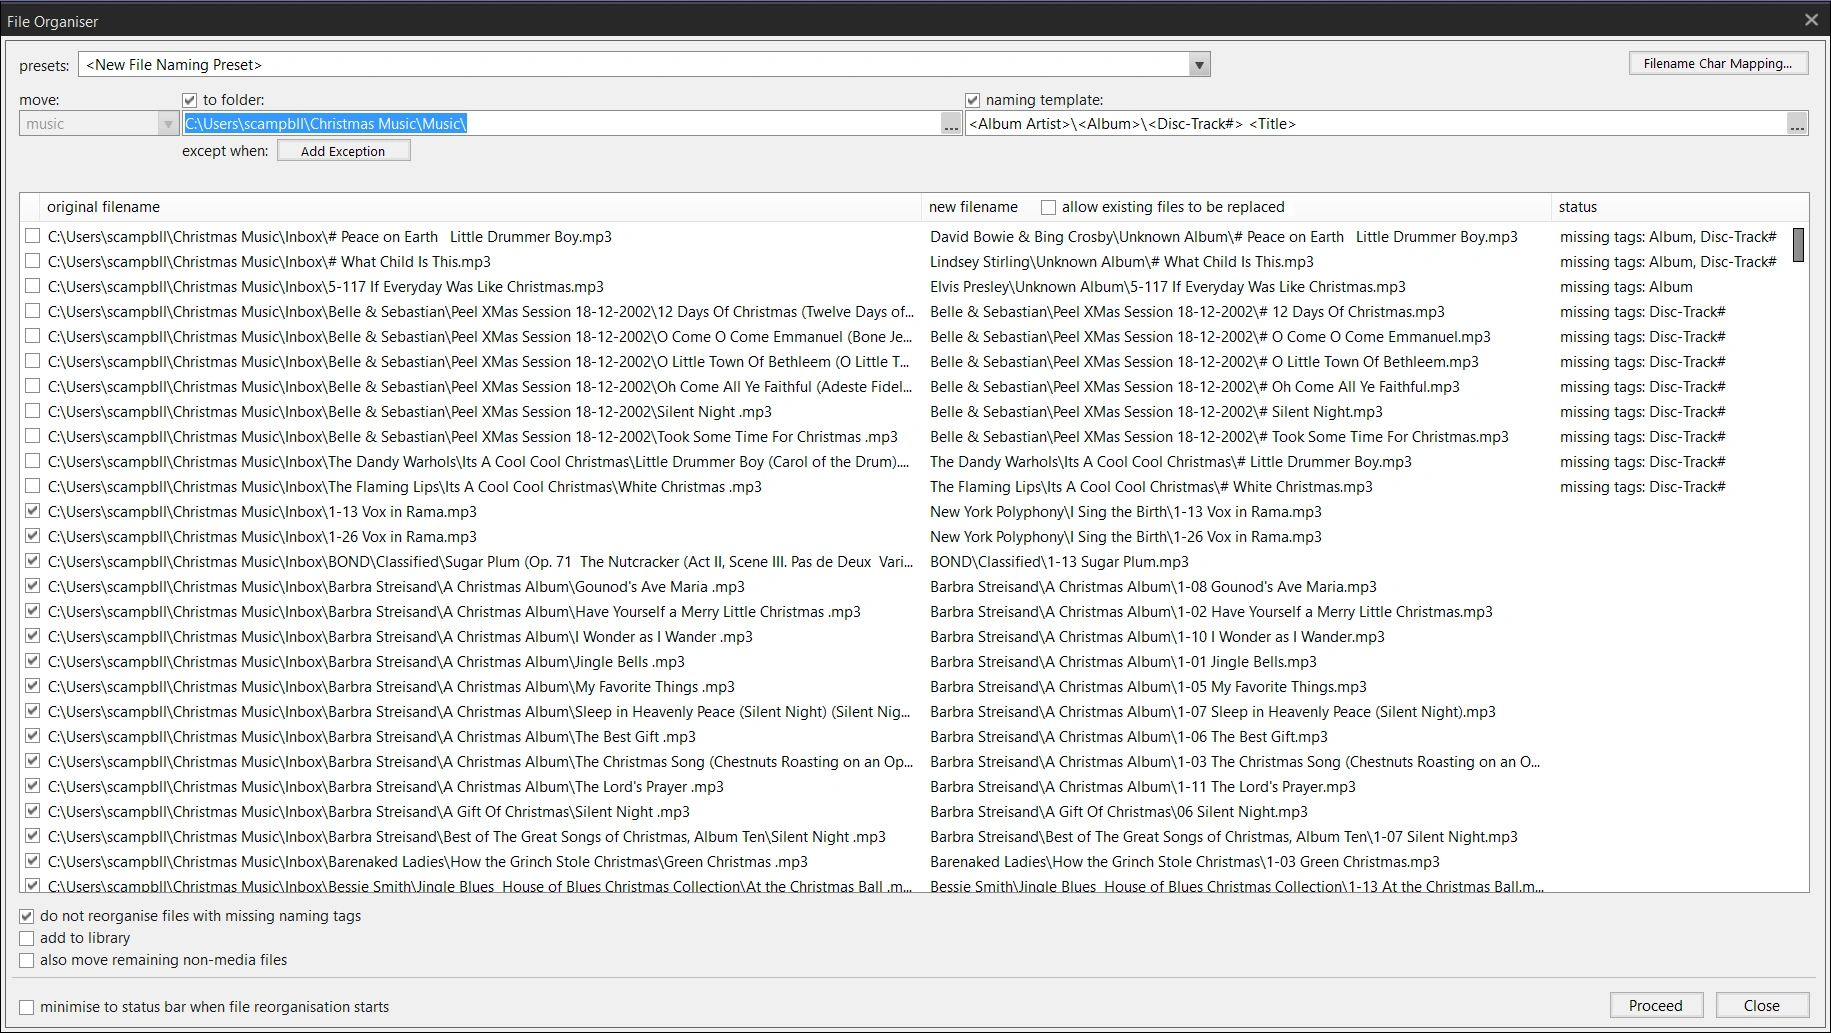
File Organizer
This command is found in the File Menu and by default has the hotkey Ctrl+R. It can also be triggered by the Rename command in the Tag Editor Menu, or by using Send To > Folder (Move) > Move to Organized Folder in the Main Panel context menu.
The File Organizer will open with all selected tracks loaded into the bottom portion of the window.
- presets
Under presets there will be a list of organization templates you've used, which you can select to load into the current window. A new preset is saved the first time you apply it to files. To delete a preset, highlight it in the list and press Delete.
- move
For manual organization, this will be grayed out and auto-filled based on the type of files selected. You may have up to three different sections, because Music, Audiobooks, and Videos are organized separately.
- to folder
(Default: ticked) If ticked, this will be the parent folder that all organized files are moved into. If unticked, the current folders will be used.
- naming template
(Default: ticked, <Album Artist>\<Album>\<Disc-Track#> <Title>) This is where you specify a template for MusicBee to use for each file when organizing it. The default template will create a folder for each artist and a subfolder for each album, then name the files with the track # and title. See Templates for more info on how to customize this. If unticked, the current filename will be used for organization.
- except when
Exceptions allow you to fine-tune your template even further using rules. For instance, if you want to organize classical music with a different template than popular music you could create an exception with the rule "Genre is Classical", and provide a different template for MusicBee to use only for those files.
Exceptions are evaluated from bottom to top: the last exception is applied first, and only files which don't match that exception are evaluated against the next. To reorder exceptions, put your cursor in the template and hold the Alt key while pressing the up or down arrow on your keyboard.
- original filename
This column shows the original names of the files, including folders below the parent folder. You can use the tick boxes to optionally exclude or include specific files for organization.
- new filename
This column shows the new name of the file according to the options you have set. If you need to adjust filenames, for instance to eliminate duplicates, you can slow double click to activate a text box (like editing tags in the main panel).
- allow existing files to be replaced
(Default: unticked) As long as this is unticked, MusicBee will append _# to the new duplicate files. If ticked, duplicate files in the target folder will be replaced by the newly organized files (replaced files will be moved to the Recycle Bin).
- status
This column shows any possible obstacles to organizing each file, such as missing tags, duplicate filenames, etc.
(Default: ticked) When ticked MusicBee will not organize files that are missing any of the tags specified in the naming template. If unticked, MusicBee will replace missing tags with the value 'Unknown X' where X is the tag name.
- add to library
(Default: unticked) Tick if you want files not yet in the Music library (such as from the Inbox) to be added as they are organized.
- also move remaining non-media files
(Default: unticked) Tick if you want non-media files (artwork, cue files, lyrics files, etc.) in the folders with files that are being organized to be moved with them.
- minimize to status bar when file reorganization starts
(Default: unticked) When ticked MusicBee will automatically minimise this window and run as a background task. Double click on the status bar to re-open this window.
Filename Character Mapping[]
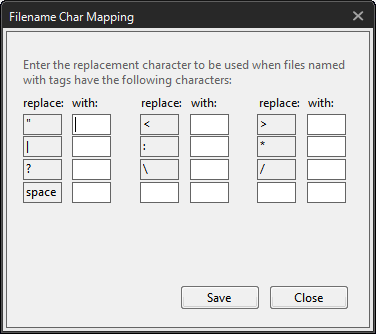
Filename Character Mapping
Filename Character Mapping tells MusicBee what you would like it to do when it encounters characters in the naming tags that are illegal in Windows filenames. By default, all characters are replaced with a space. If you delete the space in this window, the character will be removed without replacement, or you can choose a different character to replace it with. You can also specify two other characters you'd like to replace.
Move Files[]
In the Send To menu, along with "Move Files to Organized Folder," there is an option to "Move Files to Folder." This is a much simpler approach: you choose (or create) a folder and all selected files are moved there. Filenames are not changed and all files end up in the chosen folder, without any subfolders or other organization.
Copy Files[]
The "Folder (Copy)" commands (Copy to Folder or Copy to Organized Folder) in the Send To menu work exactly like the "Folder (Move)" commands, except that the files are copied, leaving the originals in place.
Individual Files[]

Manually rename files in the Tag Editor
In addition to the options above, you can rename or move any single file from the Properties tab in the Tag Editor. In the Location field, you can change the filename by typing, or move the file to a new folder by clicking the [...] button. You can also type in a new file path, but the target folder must already exist or the change will fail.
Computer Node[]
You can to some extent use the folder tree in the Computer node to organize your files, but be sure you understand how it works before you try big operations.
Dragging & dropping files to one of the folders in the sidebar is essentially the same as the Move / Copy to Folder commands from the Send To menu. Files will be placed in the destination folder using existing filenames and without any further organization.
The combination of to and from locations affects the type of operation that MusicBee will try to use. Dragging a file from the library or a playlist to a computer folder follows Windows defaults for Move and Copy: if the file is on the same drive, it is moved; if it is on a different drive it is copied. You can force a Copy instead of a Move by holding the CTRL key. Holding the SHIFT key will force a Move instead of a Copy (if this is possible). These rules also apply when dragging files to Windows Explorer.
You can move folders within the tree by dragging them, but first you must right click on the Computer Node, go into the Manage Folders menu, and tick "Allow Folders to Be Moved." You can also create, rename, and delete folders from the context menu.
Auto-Organize[]
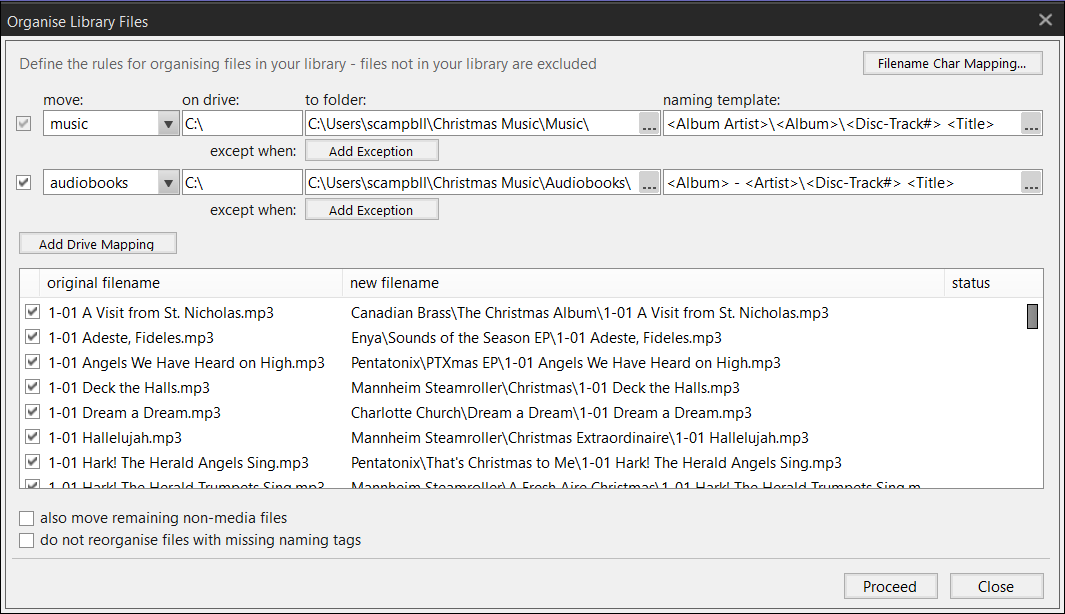
Organize Library Files
Auto-Organize, as the name suggests, organizes your media files automatically. It only applies to your Music Library, Audiobooks, or Videos nodes. It doesn't affect the Inbox or files in any other node.
With auto-organize enabled, files are organized as soon as they're added to your library. They are also updated immediately if you make changes to relevant tags from within MusicBee. Changes made to tags outside of MusicBee may not be applied right away. All manual organization is disabled when auto-organize is turned on.
The settings are almost exactly like the Organize Files settings, with a few specific differences.
- move
For auto-organize, this section has a menu allowing you to select what file category you want to organize:
- Music (Default)
- Audiobooks
- Videos
- on drive
Here you can choose which drive you want to organize files from. The "to folder" setting does not have to be on the same drive as "on drive". You could, for instance, have files from C:\ organized on another drive, M:\. If you also have organization settings for M:\, the files moved to M:\ might then be further organized.
- Add Drive Mapping
Use this button to add another group of auto-organize settings. If you have files being organized from more than one drive, you will need to create settings for each drive. You can have one template for each file category per drive.
Automatically Sweep and Organize New Files[]

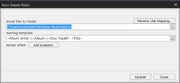
Auto-Sweep Rules
This feature only affects new files found in Monitored Folders. It uses a simplified version of the Organize Files settings. It is automatically applied, but only when a file is first added to the monitored folder; the organization is not kept in sync with later changes.
You can use this in addition to or instead of the main auto-organize option (commonly, auto-sweep is used for the Inbox, and auto-organize takes over once a file is added to the library). If both are active and there is a conflict, auto-organize will take precedence.
Auto-sweep does not move non-media files, and it will rename files that are missing naming tags. If you are likely to be adding files that are not tagged with at least title and artist, it would be a good idea to preserve the original filename by using <Filename> in your template.
Automatically Copy Files[]
- NOTE
- Not officially supported. Use with caution.
This setting allows you to copy files into your library instead of moving the original files. It was removed from MusicBee as of v2.3, because it caused files to be repeatedly duplicated for a number of users. It also had a bug where in certain setting combinations it didn't copy the files, and to fix would make the duplication problem worse.
If you would like to use this function, understand what it does, and don't find that it causes problems for you, you can enable it by amending or adding the following setting in "MusicBeeLibrarySettings.ini", which is located in the root folder for each library you have.
change
<OrganisationLibraryCopySourceFiles2>false</OrganisationLibraryCopySourceFiles2>
to
<OrganisationLibraryCopySourceFiles2>true</OrganisationLibraryCopySourceFiles2>
| File Management |
|
Importing · Organizing · Syncing · Ripping · Burning · Converting · Duplicates · Replacement · Backup & Restore · Library Preferences |